|
Introduction
Overview
Computer requirements
Packet Engine Pro
Configure AGWPE
Download and Install
Basic AGWPE Setup
2 Radio Setup
2 Card Setup
Sound Device Setup
Basic Device Settings
Rename Sound Device
Additional Settings
Using the Tuning Aid
Problems?
Program Behavior
Receiving
Transmitting
Connections
Firewalls
AGWPE Features
AGWPE on a Network
Baud Rates & Modes
Remote Control
TCP/IP Over Radio
Tips and Tricks
Traffic Parameters
Compatible Programs:
Setup Help
Radio Interface
Getting Started
Kits and Pre-assembled
USB SignaLink
Receive Audio Cable
Transmit Audio Cable
PTT (TX Control) Cable
2 Radio Modification
About Packet
Packet Overview
Exchange Modes
TNCs and AGWPE
What
To Do with Packet
Common Frequencies
Frame Headers
Further Reading
|
|
Basic AGWPE Program Configuration
For one Sound Device and One One Radio.....
Navigating in AGWPE
Configuring the Radio Port Properties
Configuring the Sound Device
Editing a Port's Properties
Configuration Problems?
It is important to understand that AGWPE uses the concept of
Radio
Ports to define how it will interface with a radio. An AGWPE
radio port is created for each TNC, radio modem, sound card/sound device that AGWPE will manage. This page will show you how to
quickly setup an AGWPE radio port for a
sound device.
Note that to complete your
configuration, you will need to decide which RS-232 port (COM or LPT)
you plan to use for PTT control, in other words, where your PTT cable
will connect to the computer. Usually this is a COM port unused by any
other device/progarm.
See PTT Cable for more information.
Before starting AGWPE, always close:
- any
programs that might be using the serial or parallel port you plan to use for PTT control
- any programs that might be accessing the
sound card
When you start the AGW Packet Engine.exe program
for the first time, you will be greeted with the
AGW Packet
Engine banner, a Software Licence Agreement
which you must accept (first running only), and a balloon message in
the lower right of the screen pointing to the AGWPE tower icon
 in your Windows System Tray
 <-- Click on small image to download
larger image
<-- Click on small image to download
larger image
The banner and balloon will disappear in a few seconds or
you can click
on them once to speed things up. Note that
AGWPE does not put an open Window on your desktop, nor will
there be a button on the bottom right Task Bar of your
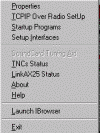
screen. Instead, the AGWPE tower icon
is the only access you have to AGWPE when it is running! Click
on it to bring up the AGWPE menu:
<-- Click on small image to download
larger image
Note: The "Sound Card Tuning Aid" option on the menu
will
be grayed out until you create and configure a "radio port"
as described below.
The first
step in working with AGWPE is to create and configure a radio port for a
sound card channel and its associated radio. From the AGWPE
menu,
select Properties. A
blank RadioPort Selection
window will open.
Press the New Port
button on the
right. A message window will appear:
A New TncPort File Has Been
Created. Click OK
to close the message and move on.
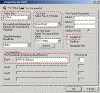
The
Properties for Port`1 window should now appear.
Remember that AGWPE also can manage TNCs and radio modems, so some
of the fields on this screen will not pertain to sound cards. The field outlined
in red will be the key fields for a sound card radio port. Follow the
step below in filling out the fields:
 <-- Click
on small image to download larger image <-- Click
on small image to download larger image
1. Make the
following selections first on this screen (i.e. TNC Setup tab):
|
Select
Port
|
enter the port where you will attach your
PTT
cable, e.g. COM1 or LPT1; see
notes below *
|
|
TNC Radioport:
Port Description
|
you can overwrite the
current description for Port 1 and enter a description
of your own choice, e.g. Icom
1200 Packet
|
* Notes about
Port selections (COM & LPT):
- To select
a
parallel port,
scroll
to the bottom of the port list
-
If
you are setting up a receive-only installation or using a
SignaLink interface or other VOX/audio-controlled PTT interface
and don't
want to tie up a real port you won't be using, the AGW
software will accept non-existent parallel
port assignments, but not non-existent serial ports.
2. You can leave all other selections at their
defaults, including Serial Port/ Modem Baud Rate, which
is not used for sound cards.
3. Now go to the TNC Type
field in the top middle of the screen and use the pull down list to
select "Sound Card".
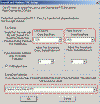
When you select
"Sound Card" for your
TNC Type (or if press the
Options button in the middle of the
TNC setup window, underneath
TNC subtype), the program will bring up the
SoundCard Modem/TNC Setup window which
looks like this:
 <-- Click on small image to download
larger image
<-- Click on small image to download
larger image
1. Baud Rates: Note
that your sound card is capable of supporting two radio ports using
its left and right audio channels. If you are only using one radio,
it will be Port 1 on the left channel. Set the left channel
baud rate for
the rate you plan to use, i.e. 300
baud for HF SSB work; or 1200,
2400, 4800, or 9600 for VHF/UHF work.
Assuming that you will not be using the
right channel for a second radio connection, set the right channel
rate for a baud rate different from the
one you have chose for the left channel. This may prevent the
possibility of future problems. (If you will be connecting to 2
radios, see Configuring AGWPE for 2 Radios.
)
2. Sound Card Selection:
Use the pull down menu to select the sound card device you will be using
with AGWPE. You may see other choices, such as a telephone modem (don't
use) or another another card if you have two.
|
Important Note:
This field
selects the sound device for receive
(recording) only. In Windows XP and
earlier, this sets the transmitting
(playback) device, too, since Windows
assumes you want to use the same sound
device for both. But this doesn't work
in Windows Vista and more recent
versions, so you need
a work-around for
setting the transmit (playback) device.
|
3. For now leave the
other fields at their defaults:
- Full Duplex Driver:
The Full Duplex Driver box
should be checked. Most recent sound cards are full-duplex capable. If you later
encounter transmitting problems, you may need to un-check the
Full Duplex Driver box. This is likely to
apply only to older sound cards; see
Problems with Connections
for more about this.
- Sound Card Clock:
This setting is used if you have problems receiving distant
stations; see the Problems with
Receiving page for more information, but for now leave the
setting at 4, the default. (Note: There is no information available
about how to set the clock adjustment if you sound card is running a
bit slow or fast. The program author says to just use trial and
error in setting a different number and seeing if reception
improves.)
Now press the
OK button to return to the
Properties for Port1 window
but do not close it yet.
4. Note that, by
default, AGWPE has created two sound card radio ports. To avoid
future operating problems,
change the setting from
Dual Port to
SinglePort in the
TNC Control Commands section of the
Properties for Port1 window.
(Doesn't apply if you really will be
connecting to 2 Radio).
For a simple, first time installation, all other selections can remain "as is" (use
the default selections), including those in the Tnc Commands
tab window in the Properties for Port1
window and any other selections on the AGWPE menu.
5. Now press the OK button at the bottom of the
Properties for Port1 window. You should get a popup message telling you to restart the
program, so click on the Packet Engine icon
once again and
select 'Exit'.
Now restart AGWPE. The Packet Engine icon
should
once again appear, but in addition you should now see a TNC icon
 next to
it. This new icon represents your new sound card Radio Port. next to
it. This new icon represents your new sound card Radio Port.
d. Editing a Port's Properties
If you want to change a setting in the Radio Port's
configuration, click on the AGWPE icon to call
up the menu, select Properties, and then click on the radio port
you want to change. Then click OK
and edit the fields in the Properties for
Portx window.
-
Any time you
have trouble starting or configuring AGWPE, it is often best to close AGWPE and
delete all port*.ini files and the agwpe.ini file in your AGWPE
directory/folder. Then restart and
re-configure AGWPE from the very beginning.
-
If you don't see this TNC
icon
, you probably have a conflict with another program or
device:
-
Make sure that the COM or LPT port you have select in AGWPE is not already dedicated to another device, for example, an
internal modem or printer) or has been "captured" by another program (for example, your Palm
Pilot's "Hot Sync Manager". You'll have to resolve any conflicts by
either closing the other program, disabling the device, or
selecting
another port for AGWPE's PTT control.
-
Make sure that no other program is running and using the the sound card.
For further help in resolving
port conflicts, go to
the Problems with Program Behavior page
on this site.
Configure AGWPE for one sound card and 2 radios
Configure AGWPE for 2 Sound Cards
|