Transmit (TX) Audio Cable
Sound Card "Line Out" to Radio TX Audio
This page has advice for those building their own
sound card to radio interface.
The TX audio cable is a little more complicated
then the RX audio cable.
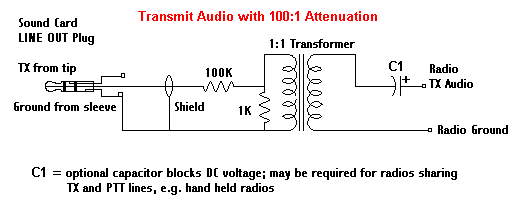
The TX audio cable must have a circuit to attenuate
the voltage leaving the sound card's LINE OUT jack, otherwise the radio's transmit
circuit will be overdriven.
Note: Use the LINE OUT
jack, do not use the SPEAKER jack (which is found on
some older sound cards). If your card or laptop only has a HEADPHONE
jack, it can be used, but you will need to lower the sound card's TX
audio volume. Quality will usually not be
quite as good as a LINE OUT.
On the sound card, the
typical color coding of the LINE OUT jack is
light
green
|
The exact attenuation will depend on both
your radio and sound card. An approximation is a 100:1 attenuation (40 dB)
which will
reduce the sound card output level (max. 2 Volt p-p) down to the
level your radio normally would expect for microphone ( 20
- 40 milliVolt p-p ). For example, a 50:1 attenuation works better for me, since
I use my my
radio's data jack which has a maximum input voltage of 40 mV p-p.
|
Don't Overdrive
Your Radio! If a sound card
(or a TNC) overdrives a radio's input circuit (i.e. it is too loud),
the radio may distort the true
packet tones as it tries to limit the signal to a maximum
deviation of approx. 5 kHz. The attenuation circuit described on this page attempts
to prevent such overdriving and distortion. Interestingly, a
1200 baud packet station that is properly adjusted with 3.25 kHz of
deviation (+/- .25) should sound softer than channel noise! |
Here's a schematic for the attenuation circuit:

Option #1: Instead of the two resistors, you
could use a 4K7 (4.7K) Ohm variable resistor (potentiometer/pot). The
pot would actually give you more
control over the attenuation, although a pot is
bulkier.
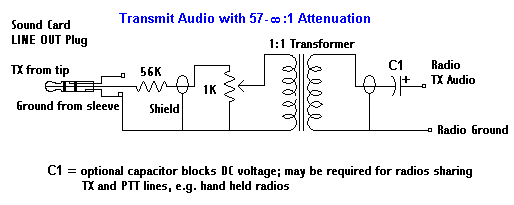
Option #2: Or here's a
schematic of a circuit that combines a pot with a fixed resistor to give
the pot a less delicate range of settings and make is easier to adjust:

To build your TX cable:
- Sound card connector: You
will need a plug that will fit the sound card LINE OUT jack, probably a
1/8" (3.5mm) stereo 3 conductor male
mini-plug (e.g. Radio Shack part #274-284 -- pkg. of 2). Do not
use a mono plug 2 conductor plug.
Note: The middle conductor (ring) of the sound
card plug (right channel) should be left unwired, unless
you are building a TX cable for a second radio

- Radio connector:
-
If you need your radio's "pinout" information, you'll
probably find it at
http://www.cqham.ru/tnc2rad.htm
or
Buck's
packet site (on Buck's site, go to the page for TNC-to-radio
cables and find your radio. Click on the "Add to Cart" button
for the cable for your radio and this will reveal a schematic of
the radio's pin out information.)
- Mobiles or Base Radios:
You can use either the microphone connection or preferably the radio's
special "data" jack, if it has one. You'll be using the
same connector as the one used for your PTT and RX line, unless you're using the speaker jack for
RX audio).
Handhelds: TX audio will go to the
radio Microphone jack, which usually require a 3/32" (2.5mm) stereo
(3 conductor) or mono (2 conductor) sub-mini plug. If your radio's
user manual says to use a stereo plug instead of a mono plug, be
sure you do. You'll also be feeding your PTT line into this plug.
Check your radio's instruction manual or either of the web sites
mentioned above for pin-out information and any
resistor and/or capacitor that may be required for the PTT and TX lines
of your radio.
-
HF Band Use: Some radios may use
different TX audio pins for HF and VHF/UHF. The ICOM 706 is one.
Consult your radio's user manual for pin out instructions. This
can be the solution if your interface transmits correctly for HF
digital modes such as PSK31 but won't transmit audio on VHF/UHF,
or vice versa
- 9600 baud use: The newer 9600-ready radios
might have a data jack pin for "9600 baud transmit", although
many have both 1200 and 9600 on the same pin. The radios will
however most probably have a menu choice for "data speed" that
affects the radio's input voltage sensitivity, i.e. the menu
selection may amplify or attenuate the TX audio. (Check your
radio's user manual.) For example, the "9600" choice allows the
pin to accept full 2V maximum, where "1200" accepts only
approximately 40mV maximum. That means, to get things right, you will
have to experiment with the:
- radio's menu setting (1200 or 9600)
- the sound card's playback volume
setting
- any voltage divider circuit or
potentiometer that is in the TX audio line to get the right
match.
- Cable material: Use a cable with a single insulated wire and a
braided shield. Small coaxial cable like RG-174U should work well;
even RG-58U would work.
- Capacitor: The value of capacitor C1, if used, is often specified
in the radio's user manual in the section on MIC/Speaker accessory plug
wiring. [The value will depend on the input type of
the radio... resistive, capacitive, or direct coupling. Resistive will
require a higher value cap (4 to 10 uF), while capacitive a bit less.
Direct I/O are best coupled at 1 uF, as RF might become a problem if
they go too high in capacitance.]
- Transformers:
1:1 audio transformer can be obtained from either
parts stores (for example, Radio Shack #273-1374) or Peter PE1MHO/G7ECN
suggests another source is old internal telephone modems that a computer store might
be glad to give you.
Note for 9600
baud packet: There's a general consensus that that
the RX and TX audio lines in your interface
for 9600 operationsshould
NOT have audio isolation
transformers . In general, the
available small and inexpensive audio or power transformers do
not have the correct frequency response range. For example,
Radio Shack's #273-1374 600 ohm 1:1 audio line transformer has a 300 Hz to 5 kHz
frequency response range which is not low enough.
Until
someone sends me an isolation circuit
with suitable components (please!), take these precautions
when running without isolation:
-
make sure the computer
and and the transceiver's power supply are connected to
the same AC power circuit (i.e. sharing the same
110/220 V ground).
-
connect/disconnect the
sound card interface to the transceiver or computer only
when both the transceiver
and computer are unplugged from the AC power
circuit.
|
Attaching the
transformer: Be sure you use the proper lead wires on the audio
transformer as identified by any accompanying schematic for the
transformer or by using an Ohm meter to determine the leads for the same
coil (windings) of the transformer. Note that if the transformer has 6
leads, two will be center tap wires that won't be used. (Don't
cut them until you know you have the 4 other leads correctly wired.)
One lead from the
primary coil of the transformer will
connect to
the center conductor (tip) of the
sound card LINE OUT plug by way of the pot/voltage divider
circuit. The other
lead from the primary coil will connect to the
sleeve (outer conductor) of the
sound card LINE OUT plug. In this circuit, it
doesn't matter which transformer lead connects to the sound card LINE
OUT and which connects to sound card ground, so long
as they are from the same coil/winding of the transformer.
On the
secondary coil of the transformer, one lead will
attach to the TX pin of the radio.
The other lead will
attach to radio ground. Again, it
doesn't matter which of the connects to the radio TX and which to radio
ground, so long as they are from the same coil/winding of the
transformer.
|
Buxcomm was offering a
simple add-on isolation cable if you don't want to build your
own. You simply plug in the Buxcomm isolation cable between your
sound card and your audio in and your audio out lines. The item
was called a ISOL8R and cost $9.97 ($17.97 for 2)
at http://www.buxparts.com/humsolving.htm
|
- When you're done, tape a "Line Out " label on
the sound card end of the TX audio cable so that you don't confuse the RX and TX cables.
Handheld Radios: Did you know?
Most handheld radios use the
microphone jack to
feed both the TX audio signal (AC) and
the PTT signal (DC) into the radio.
To make sure the TX audio signal goes into the
radio and not back out the PTT line, a
resistor is often put in the PTT line (AC will follow the
path of least resistance).
And to make sure DC power doesn't go back up
the TX audio line to ground, a capacitor is often put in
the TX audio line (capacitors block the DC but allow AC to
pass). If your handheld radio goes into constant PTT when the plug
is put in its MIC jack, the lack of the capacitor is often the
answer. (Note that the schematic above includes such a capacitor for
just that reason. It's a good precaution to take to block any DC on
the TX line.)
|
|